

Learning how to use rollator brakes is simple once you understand the two basic modes: squeezing to slow down and pushing down to lock. These hand levers work much like bicycle brakes, giving you steady control while walking and total stability when you stop to rest. Taking a few moments to practice both actions helps older adults feel confident and secure on every walk.

Steps to Operate Your Rollator Brakes
- Rest your hands naturally on the grips: Place your palms comfortably over the rubber handles with your fingers lightly curved around the brake levers underneath so you can reach them quickly without straining.
- Squeeze gently while walking to slow down: Pull both levers upward toward the handgrips at the same time to control your walking speed when traveling down small ramps, gentle slopes, or smooth hallways.
- Release the levers to roll forward again: Let go of the levers gently once you reach a comfortable pace, allowing the four wheels to turn freely along the floor.
- Stop completely before setting the parking brake: Bring the entire walker to a full standstill on level ground before you try to lock the wheels or turn around to take a seat.
- Push both levers down until they click: Press downward firmly on the handles or levers until you hear or feel a distinct snap, which engages the full parking brake lock on both rear wheels.
- Test the hold before placing your weight on the seat: Gently nudge the frame forward with your hands to make sure neither wheel moves before you turn around and sit down.
- Pull upward to unlock the parking brake: Lift the brake levers back up into their neutral middle position when you are standing tall, balanced, and ready to walk again.
Getting comfortable with these simple steps is an essential part of mastering how to use rollator equipment throughout your daily routine.

Common Mistakes to Avoid
- Squeezing only one brake lever while moving: Pulling just one lever causes the walker to swerve suddenly toward that side, which can throw off your natural balance.
- Sitting down without locking both wheels: Forgetting to push both levers down into the locked position can cause the rollator to roll out from underneath you as you sit.
- Attempting to lock the brakes on a steep slope: Engaging parking brakes on significant inclines can cause the tires to slide along the pavement rather than hold firm.
- Walking while the frame is too far ahead: Pushing the handles far in front of your body stretches your arms out and makes it hard to squeeze the levers with proper leverage.
- Ignoring loose or sticky brake cables: Walking with slack cables means the brake pads will not grip the wheels tightly when you squeeze the levers, reducing your stopping power.
- Using the walker as a wheelchair while seated: Trying to push yourself forward with your feet while sitting on the rollator seat can tip the entire unit backward or sideways.
When to Seek Professional Advice
While hand brakes are straightforward, your physical safety depends on proper fit and mechanical reliability. If you notice that one wheel turns even after you push the parking lever down, or if the levers feel too stiff for your hands to squeeze comfortably, it is time to ask for assistance. You can reach out to a local medical supply technician, an occupational therapist, or a physical therapist. Tell them the exact make and model of your walker, explain how the lever feels in your hand, and describe whether the wheel is slipping or sticking.
A physical therapist or occupational therapist can also check your posture, grip strength, and walking stride to make sure you have the right equipment. Practicing proper movement habits and using stable equipment can lower the risk of accidents according to guidelines on falls and falls prevention shared by national health experts. If you need help finding qualified local resources, the Eldercare Locator connects families to supportive community services and mobility specialists in their home area.
How to Use Rollator Frame Features for Daily Balance
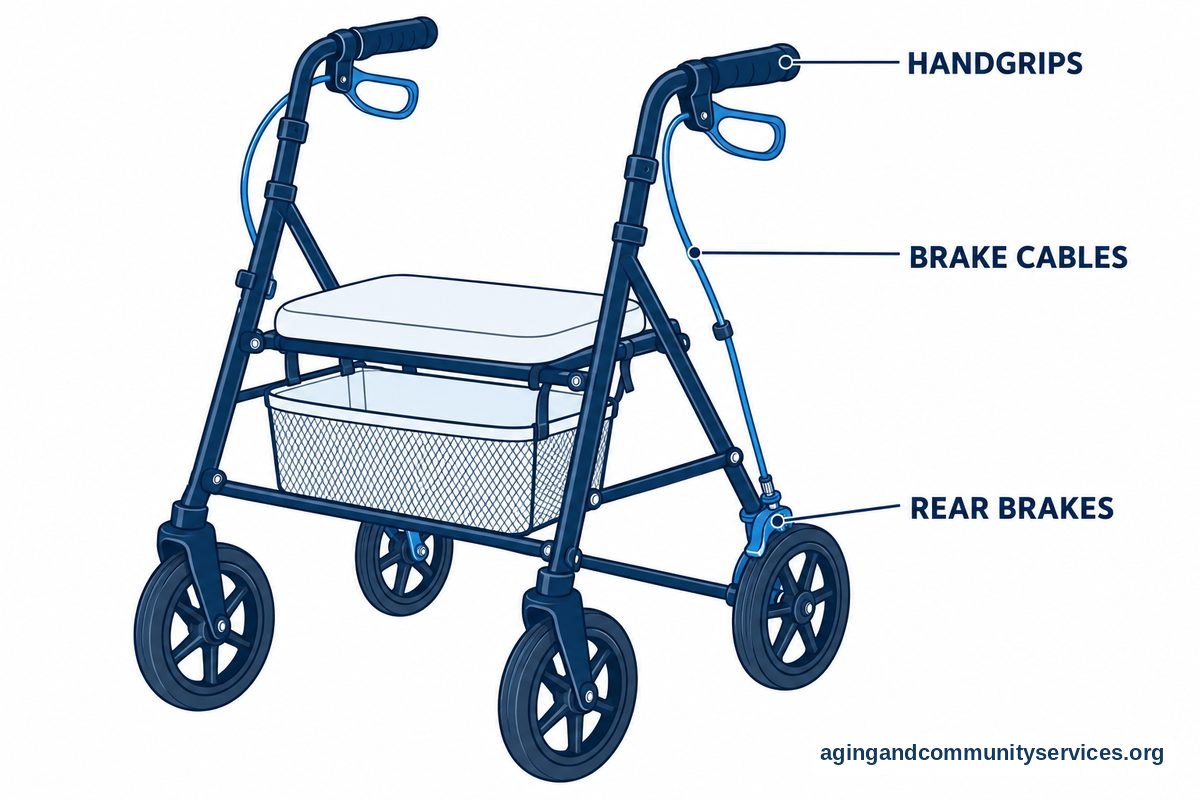
Understanding how to use rollator frame components correctly ensures that your brakes work as intended. The frame is the sturdy metal skeleton that supports your body weight, holds your storage basket, and houses the brake cables. When walking, keep your body centered inside the frame rather than trailing behind it. Your hips should stay aligned between the rear wheels, and your elbows should have a gentle bend of about twenty to thirty degrees when your hands rest on the grips.
The height of the frame handles also directly impacts your braking control. If the handles are set too high, your shoulders will hunch up, making it tiring to reach the brake levers. If the handles are set too low, you will lean forward, which places excess downward weight on the front wheels and lifts the rear braking wheels off the floor. Adjusting the frame legs or handle posts so the handgrips line up with your wrist creases when your arms hang naturally at your sides gives you the best control over the brakes.
Many people compare a rollator vs rolling walker when deciding which frame style matches their daily balance needs. A rollator frame features swivel wheels on all four legs, which provides smooth glide outdoors but requires constant attention to your hand brakes. Maintaining proper frame posture keeps your center of gravity right where it belongs, ensuring that your brake pads make firm contact with the rubber tires every single time you squeeze the levers.
Adjusting and Caring for Your Rollator Brakes
Over time, the cables that connect your hand levers to the rear wheel brake pads can stretch with regular use. When cables stretch, you may find that you have to squeeze the levers almost all the way to the handle grip before the wheels begin to slow down. Most modern rollators feature simple adjustment nuts located either near the hand lever or right beside the rear wheel brake shoe. Turning these nuts slightly can tighten the cable tension, restoring a crisp and responsive braking action.
Regular maintenance also keeps the brake mechanisms working smoothly in all weather conditions. Check the rubber tires periodically to remove small pebbles, dirt, or carpet fibers that might lodge near the brake shoe. Wipe the metal rims and brake pads with a dry cloth to prevent grease or moisture from causing the wheels to slip during braking. Taking good care of these parts helps you choose from trusted rollators for seniors that remain dependable for years of everyday use.
| Brake Issue | Common Cause | Simple Solution |
|---|---|---|
| Lever feels very loose | Stretched brake cable | Tighten the barrel adjuster nut near the lever or wheel |
| Wheel slips when locked | Brake shoe too far from tire | Adjust cable tension so pad presses firmly against rubber |
| Parking lock hard to push | Internal spring or pivot is stiff | Ask a medical equipment shop to inspect and lubricate pivots |
| Brake rubs while walking | Cable is pulled too tight | Loosen the adjustment screw until the wheel spins freely |

Frequently Asked Questions
How do I know if my rollator brakes are working properly?
You can test your brakes by pushing both levers down into the locked position while the rollator is resting on a flat, even surface. Try to push the frame forward using moderate arm pressure. The rear wheels should stay completely stationary and resist sliding across the floor. When you release the parking lock and squeeze the levers upward, both wheels should slow down smoothly and evenly without pulling to one side.
Can I adjust the tension on my rollator brakes myself?
Yes, many rollators have a tool-free adjustment screw called a barrel adjuster located where the brake cable meets the hand lever or the rear frame. Loosening the outer lock ring and turning the adjuster counterclockwise will tighten the cable tension, bringing the brake pad closer to the wheel. However, if you are unsure or lack hand strength, asking a friend, family member, or medical equipment technician ensures the adjustments are set safely.
What should I do if my hands are too weak to squeeze the brakes?
If arthritis or reduced grip strength makes squeezing the standard levers difficult, speak with an occupational therapist. Some rollator models feature loop-style brakes that can be operated using the heel of your hand rather than your fingertips. A therapist can also show you alternative grip techniques or help you learn how to choose a rollator designed specifically with soft-touch, low-effort braking mechanisms.
Why does my rollator slide even when the brakes are locked?
A rollator may slide if the rubber tread on the rear tires has worn down smooth, or if the brake shoe is not pressing tightly enough against the wheel surface. Dust, water, or polished indoor flooring can also reduce traction under the wheels. Check that the brake pads are aligned directly with the tire center, clean off any debris, and replace worn tires when the tread becomes thin.
Do all four wheels lock when using rollator brakes?
On almost all standard rollators, the brake levers control only the two rear wheels. The front wheels are designed to swivel freely so you can steer easily around corners and obstacles. Because only the back wheels lock, it is important to stand directly behind the walker and apply your weight downward into the frame rather than pushing sideways when you engage the parking locks.
